I am a visual learner. It is easier for me when I see something to make sense if it. Especially with a crochet pattern. I prefer crochet charts for patterns as well, reading patterns gets confusing and I always seem to loose my place. So we will see how it goes for writing a tutorial. I hope I can do it and not confuse you.
This is my first tutorial of many to come! We are starting with a simple but adorable bow.
This can be adjusted to be made smaller or larger very easily.
To start I am using a 5mm hook. 1 elastic headband and worsted weight red heart yarn.
BOW:
Chain 9
1st row: Half double crochet in second hole from the hook, then in each stitch till the end giving you 8 stitches.
2nd row: Chain 1 turn, hdc in each stitch till the end repeat for 10 more rows. Fasten off and leave about 10" of yarn to fasten your bow to the headband.
Chain 4
1st row: hdc in second stitch from hook, then in the next two stitches giving you three stitches.
2nd row: Chain 1 turn, hdc in each stitch, repeat the next 3 rows. Fasten off and leave of 4" yarn.
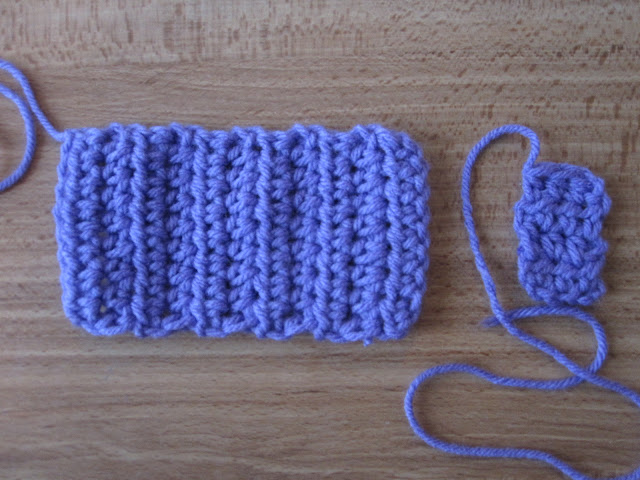
You now should have these two pieces.
Take your headband and pinch your bow in the center around your headband.
Take the second part of the bow and wrap around the center where you were pinching and fasten the ends together. Weave in the remainder.
Now on the other long string hanging out. Weave from the corner from where the string in hanging out to the center and start looping around the headband and back in to the bow till the end. Weave in to hide the end under the headband and clip the rest off.
....
After all the bows were done I started on some cute spring flowers.
They are sweet and happy little flowers that are just the right size for any age girl.


Such a simple and beautiful idea! Thanks you so much for sharing with those of us who are not so talented. You're making the world beautiful! 8-)
ReplyDelete